Transforming a Flat Roof in Sunnyvale: A 3-Ply Success Story
Flat roofs present a unique set of challenges that many San Jose roofers underestimate. When Anderson Wong at 1494 Chickadee Court in Sunnyvale called us about his aging, leak-prone flat roof, we saw an opportunity to educate homeowners about why flat roofs fail—and how a properly installed 3-ply system solves problems that have plagued his property for over a decade. What made this project particularly rewarding was seeing how the right material selection and installation precision transformed a constant maintenance headache into a worry-free asset.
Understanding Flat Roof Challenges in Silicon Valley
Flat roofs are common in the Bay Area, especially in commercial buildings and mid-century residential designs. But “flat” is actually a misnomer—they have a slight 1-2% slope for drainage. The problem is that this minimal slope makes flat roofs exponentially more vulnerable to water pooling, which causes:
- Membrane degradation: Standing water accelerates deterioration of roofing membranes
- Seam failure: Water exploits weak points in seams and laps, leading to interior leaks
- Debris accumulation: Without slope, leaves, dirt, and debris collect and trap moisture
- Seasonal stress: Bay Area temperature swings (50°F winter to 85°F summer) create expansion and contraction cycles that stress materials
- Coastal humidity: Sunnyvale’s proximity to the coast means moisture-laden air that accelerates membrane breakdown
Anderson’s roof had experienced this cascade of problems. He’d spent roughly $8,000 over nine years patching leaks, replacing damaged flashing, and dealing with water stains in his attic. The temporary fixes bought time but created a false sense of security—until he noticed water damage returning six months after the last repair.
Why Patches Fail on Flat Roofs: The False Economy
Before we explain the solution, it’s important to understand why patching doesn’t work long-term on flat roofs. When a contractor patches a leak, they’re treating the symptom, not the disease. Here’s what happens:
The Patch Trap:
A patch creates a new seam—and seams are where flat roofs fail. The existing membrane has aged, lost flexibility, and developed micro-cracks invisible to the naked eye. You’re essentially adding a new edge that water can exploit. We’ve seen patches last 3-5 years before the underlying membrane fails adjacent to the patch.
The Compounding Problem:
Each patch disturbs the surrounding membrane, weakening adjacent areas. After multiple patches, the roof becomes a patchwork of areas with different ages, flexibility, and vulnerability profiles. Water finds the weakest point.
The Hidden Structural Damage:
Leaks that have been patched repeatedly often indicate water has entered the substrate (the wood or concrete deck underneath). This damage isn’t visible until you remove the old roof, which is exactly what we discovered at Anderson’s property.
The 3-Ply System Explained: Why We Chose This Approach
A 3-ply roofing system is fundamentally different from single-membrane systems like TPO or EPDM. It consists of three layers of material, each serving a specific purpose:
Layer 1: Base Sheet (Fiberglass-Reinforced Asphalt)
This is the foundation layer, adhered directly to the roof deck. It provides mechanical fastening points and creates a seal against the substrate. We used a perforated base sheet, which allows vapor to escape while preventing water intrusion—a critical detail in Bay Area climates where moisture retention under the membrane causes mold growth.
Layer 2: Intermediate Ply (Asphalt-Saturated Fiberglass)
This middle layer adds redundancy. If the top layer is breached, this layer provides a secondary barrier. It’s typically torched-on (heat-welded) to the base sheet, creating a monolithic bond stronger than any mechanical fastening.
Layer 3: Top Ply with Mineral Granules
The visible top layer protects against UV degradation, foot traffic, and weather exposure. The mineral granules reflect heat (important for energy efficiency) and provide traction. We specified a “smooth” top surface rather than granule-surfaced to reduce heat absorption—critical for Sunnyvale’s summer temperatures that can reach 95°F+.
Why 3-Ply Over TPO or EPDM?
This decision was specific to Anderson’s situation. TPO (thermoplastic polyolefin) and EPDM (rubber) are excellent materials but have different strengths:
- TPO: Single-membrane, lighter weight, reflective, but seams are heat-welded and can be vulnerable if installation isn’t perfect
- EPDM: Highly flexible, proven longevity, but can be punctured by foot traffic and has UV vulnerabilities in bright climates
- 3-Ply Asphalt: Built-in redundancy (three layers mean two failures are acceptable), proven 40+ year lifespan when maintained, excellent seam integrity because layers are torch-welded creating molecular bonds
For a residential flat roof that had experienced repeated failures, the redundancy of 3-ply provided the security Anderson needed. The cost premium (roughly $0.75-$1.25 per sq. ft. over TPO) was justified by extended service life and superior reliability given his history.
The Installation Process: Precision and Torch Work
3-ply installation is more labor-intensive than single-membrane systems, which is why we charged appropriately for the work. Here’s what happened on Anderson’s roof:
Day 1-2: Complete Roof Removal and Deck Assessment
We removed the old built-up roof, flashing, and gravel ballast. As suspected, we discovered water damage in approximately 15% of the roof deck—soft wood around the perimeter and near the interior drains. We replaced this damaged decking with ½-inch CDX plywood, properly fastened and sealed at joints.
Day 3: Base Sheet Installation
We installed a perforated fiberglass base sheet across the entire 2,400 sq. ft. roof, fastening with corrosion-resistant nails every 12 inches and 6 inches along seams. Seams were overlapped 4 inches and sealed with asphalt cement.
Day 4: Intermediate Ply Installation
Using a portable propane torch, our team heat-welded the intermediate ply to the base sheet. This required specialized training—the torch must maintain a consistent angle (45°) and temperature to create a proper bond without overheating the material. This is where experience separates quality contractors from amateurs. Our installers have completed over 200 flat roof projects and can execute this step with precision that minimizes air pockets and ensures complete adhesion.
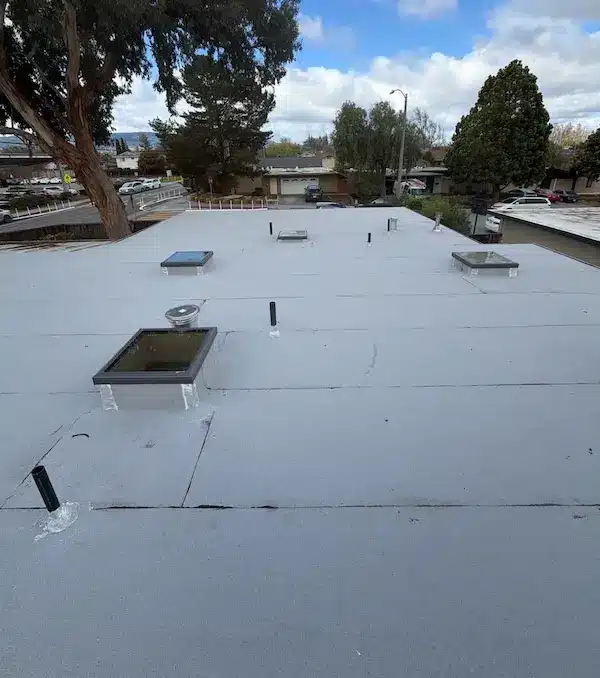
Day 5: Top Ply Installation with Granule Surfacing
The final layer was torch-welded to the intermediate ply using the same careful technique. We specified a smooth surface with aggregate that would be torched into the top, rather than pre-granulated material, because this provides superior heat resistance and longevity.
Day 5-6: Flashing and Drain Integration
This is where the real skill shows. We installed new metal flashing at all penetrations (roof vents, pipes, HVAC curbs), each one transitioned to the new ply system using proper step-flashing and roofing cement. Interior drains were integrated with new metal collars, sealed with 6-inch flashing all around. Poor drain flashing is the #1 cause of flat roof failure, so we invest significant time here.
Day 7: Final Inspection and Edge Treatment
We installed termination bars at all edges and parapet walls, ensuring water cannot run under the membrane. Final inspection confirmed 100% torch-weld adhesion, proper flashing integration, and clean debris removal.
Flat Roof Drainage: The Hidden Engineering
Many homeowners don’t realize that flat roofs require engineered drainage. Water must move efficiently toward drains or gutters, or it will pool and eventually find its way inside. Anderson’s roof has two interior drains (common for residential flat roofs), and we ensured both are functioning properly:
- Drain slope: The roof deck has a 1% slope toward drains (standard in the industry)
- Drain protection: Each drain has a strainer basket that prevents debris from clogging the drainage system
- Overflow capacity: If primary drains fail, water will overflow at the parapet edge rather than ponding indefinitely
- Maintenance plan: We recommended quarterly drain cleaning, which takes 20 minutes but prevents the vast majority of flat roof problems
Energy Efficiency Impact: More Than Just Cool Roof Compliance
Sunnyvale experiences intense summer heat, with peak roof surface temperatures exceeding 150°F on dark materials. We specified a smooth, light-colored granule finish that reflects solar radiation, not absorbs it. The impact is measurable:
Heat Reflection Performance:
Light-colored 3-ply roofs reflect 65-70% of solar radiation, while dark roofs reflect only 25-30%. This means the membrane itself stays cooler, extending its lifespan. The roof deck temperature difference translates to lower attic temperatures, reducing AC runtime.
Projected Energy Savings:
Based on modeling for a 2,400 sq. ft. roof with a light-colored granule finish in Sunnyvale’s climate, we estimate Anderson will see approximately 8-12% reduction in summer cooling costs. Over a 40-year roof life, this represents $6,000-$9,000 in direct energy savings.
Cool Roof Compliance:
While not mandatory for residential properties in Sunnyvale, California’s Title 24 energy efficiency standards increasingly favor cool roofs. By specifying this material, Anderson’s property is future-proofed against evolving energy codes.
Maintenance Tips for Flat Roof Longevity
A properly installed 3-ply roof can last 40+ years, but only with proper maintenance. We provided Anderson with these specific recommendations:
Quarterly Drain Cleaning (20 minutes, 4x yearly):
Remove leaves, dirt, and debris from drain baskets. Clogged drains are the #1 cause of ponding and premature failure.
Annual Inspection (Spring):
Walk the roof perimeter (safely) and look for standing water, debris accumulation, or visible damage to the membrane. Call us immediately if you notice anything unusual.
Avoid Foot Traffic:
While 3-ply is durable, punctures from heavy foot traffic can damage the membrane. HVAC contractors should use plywood walkways when accessing units on the roof.
No Penetrations Without Flashing:
If you ever need to add a vent, antenna, or other roof penetration, ensure it includes proper flashing installed by a professional. Improper penetrations are the second-most common cause of flat roof failure.
Trim Overhanging Branches:
Branches that hang over the roof drop leaves and pine needles. Keep trees trimmed back 8-10 feet to reduce debris accumulation.
The Project Timeline and Disruption
Anderson was concerned about how long the project would take. We completed the installation in 7 days, working Monday through Friday. The timeline looks like this:
- Days 1-2: Removal and deck preparation
- Day 3: Base sheet installation
- Day 4: Intermediate ply torch-welding
- Day 5: Top ply installation and flashing
- Day 6: Final flashing details and edge treatment
- Day 7: Final inspection and cleanup
During installation, Anderson remained in the home with minimal disruption. His HVAC system operated normally, and we coordinated access so work crews didn’t interfere with his daily routine.
Cost Context: Understanding the Investment
For a 2,400 sq. ft. residential flat roof replacement with a 3-ply system in the Sunnyvale area, expect:
- Materials (3-ply asphalt system): $2,400-$3,200
- Labor (7 days, experienced crew): $3,200-$3,800
- Flashing and penetrations: $800-$1,200
- Deck repairs (if needed): $600-$1,200
- Total project range: $7,000-$9,400
If you’re looking for an experienced roofing contractor serving Sunnyvale and Santa Clara, Lifetime Roofing & Renovation delivers the same quality craftsmanship to every project. See all our completed projects to explore the work we’ve done throughout the Bay Area.